The other day while scanning the sale ads for all the local grocery stores I found that one store had whole chickens on sale for $.79 per pound. Sounded like a good deal so onto my list it went. I like to pick up a whole chicken or two when they are on sale because I can get more than one meal out of just one chicken. So this is what I made with my one, on sale, whole chicken:
Oven Roasted Whole Chicken
Take your whole chicken out of the wrapper and pull out the junk they put inside (neck, liver, giblets, etc.) My mom always finds something to do with those, but really, I don't want to know! Next rinse your bird in cool water inside and out, then drain it. Pat it dry with paper towels and set onto a plate. Grab your Extra Virgin Olive Oil and pour a little onto the bird and massage it into the skin on one side, next rub in your seasoning. I use a homemade seasoning salt mixture, repeat on the other side as well. Next grab your Reynolds Oven Bag* and prepare it according to the directions that come with it. You'll need to put a tablespoon of flour in and shake it around, I used Tapioca Flour, then you'll place your prepared bird into the bag and seal it. Then cut 6 one inch slits into the bag so that it doesn't explode while its in the oven!!! Cook according to the directions that come with the bag. Serve with a side and you've got dinner!
Chicken Stock
After you've cooked your whole chicken and enjoyed it you'll need to clean the bones. Save all that leftover meat! Remove all the skin and all the meat. In your crock pot place chopped celery, onions, and carrots along with the bones from your chicken and cover with water, season to taste with salt, pepper, garlic,whatever suits your taste. Turn your crock pot on low and cook for at least 24hrs. When done strain out all the bones and veggies and store in 2 cup increments in Ziploc baggies in the freezer. Use in place of canned chicken broth in recipes. I got 8 cups of broth.
Nachos
In my previous post I told you how I made nachos with the leftover chicken from the whole oven roasted chicken I made. We also had some left over Tri Tip Roast so we didn't use all that much of the left over chicken. Top your Beanitos Bean chips with your choice of toppings, we used leftover chili, chicken, tri tip, tomatoes, lettuce, black olives and Daiya cheese, pop in the microwave to heat and YUM!
Easy Chicken and Potato Soup
Since I still had leftover chicken, tonight for dinner I wanted to use it up, so I made this super easy soup/stew, or as my hubby would call it "Stewp".
4 Med- Small Potatoes, peeled and cubed
2 Stalks of Celery, washed and chopped into large chunks
2 Large Carrots chopped into large chunks
1/2 an Onion chopped
1 Tbls Olive Oil
3 Cloves of Minced Garlic (jarred is fine)
Leftover Chicken
1 Can of Chicken Broth or 2 Cups of Chicken Stock (see above)
2 C water + 3Tbls divided
2 Cubes of Edward & Sons Not-Chick'n Bouillon Cubes*
3Tbls Tapioca Flour
Salt and Pepper to taste
In a large pot heat the olive oil over med heat, add in onion, garlic, and celery and saute until translucent. Add in broth/stock 2C of water and bouillon cubes. Add potatoes, chicken, and carrots, Stir. Cook on med/high heat until it starts to boil. Lower heat and cover pot, allow to simmer for 45-60 minutes or until potatoes and carrots are soft. In a small bowl mix the tapioca flour and 3Tbls of water to form a slurry, mix out any lumps. Add slurry to soup pot and stir well to mix it into the soup. Allow to simmer covered for another 20 mins. Serve topped with Daiya Cheddar cheese (optional) and a side of allergen free bread or crackers.
*http://www.edwardandsons.com/ These little gems are great! They are Vegan, Gluten Free, Free of Dairy and Soy. Though not as flavorful as the regular bouillon cubes they are handy! And we've never had a reaction to them.
*http://www.reynoldsovenbags.com/ These I love because your chicken or turkey won't get all dried out in the oven and no need to baste!
Sunday, September 30, 2012
Thursday, September 27, 2012
One of my favorite products.....
When I figured out that we had to cut corn out of the kids diets I had a personal boohoo moment, actually I got depressed and I may or may not have shed a tear or two. We live in the southwestern United States and Mexican food is a very big part of our lives. At every party and a couple of times a week we have something that includes a major staple in that type of food, corn tortillas. We eat corn tortilla chips dipped in ranch, dipped in salsa, eat them with TexMex dip, etc, etc, you get the idea. We always kept a bag of them, especially a HUGE bag of them from Costco, in the pantry. You're going to have a party??? I'll bring the corn chips! Well no more! I wanted to cry, I may or may not have. Not only did I discover that corn is in practically EVERYTHING, take a look at most ingredients labels and you'd be shocked what it shows up in (just ask my mom who was letting the littlest one drink pancake syrup out of a little cup when she was babysitting the kids for the weekend causing his latest major reaction because the pancake syrups number one ingredient was corn syrup, and she never suspected that today's pancake syrup was any different from the Maple syrup she grew up eating on pancakes. In her defence it took me a while to figure that one out as well and she gave him a little cup for dipping his pancakes in but he thought it was much better to skip the whole dipping part and just drink it instead), but I also loved serving corn on the cob whenever we'd BBQ during the summer, and it was a cheap easy veggie that the kids would eat.
Potato chips just didn't cut it in all situations where we'd need chips. We were all so used to corn tortilla chips. I figured we'd have to live without a lot of the things we loved because you just can't eat them without tortilla chips, but living without is just not me, I needed a substitute. I just happened to be in Target one day because they sell the Enjoy Life Plentils, another great chip that are allergen free, (check them out: http://plentils.com/ )
and no other store in my repertoire of stores carries them, and to my surprise on the next shelf up was these things called Beanitos: http://beanitos.com/

They are chips made from beans. Caught my interest because they looked like some of the fancy corn tortilla chips from my time in New Mexico, blue corn, etc. I picked up the bag to reminisce (yes, I reminisce about food now that so much of it is off limits, don't judge my pathetic life!) and I started to read the package. Very top of the bag said: Always CORN FREE. I was intrigued, so I kept reading, Black Bean Chips, they are Certified Low Gylcemic, Corn Free, Gluten Free, High Fiber, 4g of Complete Protein, and Non GMO Project Certified. YES! I was already in love but I had yet to turn the bag over and read the ingredients, I've been fooled by the advertising on the front of packages before. Once I did I grabbed a bag and took them home to try out with the kids. I bought two different flavors, Black Bean and Pinto and Flax. Gotta say the pinto and flax are not my fav, theres sort of a weird taste to them which I attribute to the flax. But the black bean ones are good, you could almost close your eyes and imagine they are corn chips!
Now I've just realized that they do use guar gum in them so I will be forgoing them since I'm suspecting that in my most recent allergic reaction, but the kids have all done fine with it. I suspect that the guar I bought was contaminated with another substance, I've read that guar and soy are very similar and/or they are often cross contaminated, not 100% sure what the deal was, but I will be avoiding it.
So tonight we are having make your own nachos night for dinner. I planned my weekly menu around using the leftovers for a nachos night. Earlier this week we had chili, tri tip roasted in the crock pot, and oven roasted chicken all of which I will reheat and use in the making of our nachos. The kids can choose a meat to go with the beans and Daiya cheese and chopped tomato and black olives for topping their Beanitos with and Voila! Nachos!
Allergen Free Granola Bars
So I started the littlest one on his Top Allergen Eliminations Diet yesterday. I was scrambling around trying to convert one of my easiest bread recipes to allergen free using an all purpose gluten free flour mix, but I didn't know that its just not possible to swap out gluten free flour for wheat flour straight across without more adjustments to the yeast and other leavening thingamagigs. It turned out ok I suppose. I used a gluten free flour mix that you put together yourself and calls for adding in xanthum gum, well most xanthum gum is grown on corn, so its a no-no for us. So through research people with corn issues sub in guar gum. So I used that and lo and behold I had an allergic reaction to the guar! Me, not the kids! All the other stuff in the flour mix I've had before with no problems, the only new thing was the guar. So after I was able to drag myself off the couch without dying, I went into the pantry and opened the guar gum to smell it, to test my theory that it was definitely the guar, threw myself right back into the depth of another reaction! So no more guar gum! That throws a huge wrench into my gluten free plans.
I spent time researching and found one brand of xanthum gum that is allergen free, not grown on corn!!!!! But the price..... WHEW! And of course its not sold in stores and has to be ordered and the shipping costs more than the product! I ordered it off Amazon, but I really have no other choice since xanthum or guar gum is essential to baking gluten free. So, though it hurt me in the tummy to spend that much on a product, and especially the shipping, I did it because my kiddo needs bread!
Here is the xanthum gum I ordered: http://www.authenticfoods.com/products/item/31/Xanthan-Gum
After my failed bread attempt that almost killed me, thank God for Benedryl! I wanted to make safe granola bars that would fit into the littlest ones diet. Here is what he is having to avoid:
Dairy
Soy
Corn
Wheat/Gluten
Nuts
Peanuts
Fish/Shellfish
Berries
Citrus/Citric Acid
Eggs
As you can see this makes things kinda difficult. So I took the granola bar recipe I posted the other day and modified it to make it safe for him.

Allergen Free Granola Bars
Ingredients
4 1/2 C Gluten Free Regular Slow Cooking Oats
1C Gluten Free Flour
1 tsp Baking Soda
1 tsp Vanilla
2/3 C Coconut Oil Melted (the original recipe called for melted butter but since the Earths Balance Soy Free one contains natural flavoring derived from corn I subbed in the oil, no coconut flavor at all!)
2/3 C Honey
1/4 C Agave Nectar
1/3 C Brown Sugar Packed
1/2 C Enjoy Life Mini Chocolate Chips
Preheat oven to 325*. Combine all ingredients but the chocolate chips. Mix well and then add in the chips and mix to distribute them. Line a 9X13 inch cake pan with foil and spray with safe non stick cooking spray. I like Olive Oil spray. Press the mixture into the pan and using wax paper to cover your hand press down really well. Make sure you compact the mixture a lot or it will fall apart after its cooked. Bake for 20-25 mins or they look really golden brown. Allow to cool in pan and then pull out your foil and then cut into bars. I cut mine small since the littlest one is only 2.5 years old and doesn't eat too much.
Sunday, September 23, 2012
Granola Bars!
I've been MIA around here for a bit. I'm still waiting to hear back from the kids GI doctor as to the top allergen elimination diet he wants done with the littlest one, so I haven't really felt like a big cooking or baking project since I'll have to keep it from the littlest one. I found out at the end of the week after still no response to the email I sent to the doctor that he was on vacation. So, since I was sick of us eating only basics and not really trying anything new I got in the groove today and spent the day roasting myself in the kithcen with the oven and stove both going full tilt. It's supposed to be fall already, but we are still in the high 90's to 100's around our neck of the woods. But I was productive and did a lot of baking and cooking today (yesterday as well actually).
Yesterday I baked pizza's and cinnamon sticks. I made extra to freeze as well. And today I made..... are you ready for it? Drum roll please....... Granola Bars, Sweet Potato Muffins, Rosemary Olive Oil Bread (in the crock pot!), and Chili. We had the chili and bread for dinner tonight, and the granola bars and muffins are for the older boys lunch boxes for school. Oh and I was doing laundry the whole time! I'm so proud. Now I will crawl into bed and pass out! Well, once the kids are in bed that is.
Today I'll share the granola bar recipe since they are super easy and really yummy.
Basic Granola Bars
4 1/2 C Rolled Oats (regular not quick cooking, you could definitely use gluten free oats too!)
1 C Flour (choose your flour)
1 tsp Baking Soda
1 tsp Vanilla* (be aware that almost all vanilla extract is suspended in corn alcohol)
2/3 C Butter, Melted** (your choice of safe alternative like Earths Balance, depending on your allergens)
1/2 C Honey (I'm pretty syre you could use Agave Nectar as well)
1/3 C Brown Sugar Packed
1/2 C Add in of your choice, today I used raisins, but you can use nuts, dried fruit, peanut butter, mini chocolate chips from Enjoy Life brand, etc.
Directions:
Combine all ingredients except for the add in item. You may need to add a bit more honey to make it really hold together. I did. Then add in your extra item and mix til distributed evenly throughout mixture. Line a cake pan with foil and spray with cooking spray, I used Olive Oil spray. The easiest way to get the foil to shape correctly to your pan is to turn the pan over so the opening is on the counter lay the foil over it and shape it to fit the pan. Once you have it fitting snugly to the outside of the pan gently pull it off, maintaining the shape as much as you can, and flip your pan over and insert the foil. Dump your granola mixture into the cake pan and using a piece of wax paper to cover your hand (this will be sticky and the wax paper will keep your hands clean and your granola in the pan) press the granola mixture down firmly and evenly throughout the pan. Make sure you really compact and press the mixture really, really good. If not it will crumble apart after you bake them and try to cut them. When you think you have it pressed down enough, do it some more! Bake at 325* for 18-22 minutes, depending on how thick they are. You want them to be really golden brown. Allow to cool in the pan. Once cooled, flip your pan over and they will dump right out. Pull the foil away and cut into individual bars. I like to "wrap" mine in individual snack size baggies so they are easy to pack in the kids lunches.


*Since most Vanilla Extract is suspended in Corn Alcohol there is a simple way to make your own. Buy a 750mL bottle of Potato Vodka and 2-3 Vanilla Beans. Put the beans into the vodka and place in a cool, dark place for about a month. Shake about once a week to mix up and get the bean to release more vanilla-ness.
**I have recently come to realize that the Earths Balance Soy Free Margarine that we've been using contain corn products (insert sad face here) and maybe one of the reasons the littlest one is still reacting. So someone, don't remember who, but someone I'm following on Pinterest pinned a Vegan "Butter" that looks super easy to make at home. I have yet to make it, but its dairy, soy, corn and gluten free! I'm super stoked to make it and once I make my next trip to the health foods store to get some of the ingredients I will let you all know how it comes out and pass on the recipe.
Yesterday I baked pizza's and cinnamon sticks. I made extra to freeze as well. And today I made..... are you ready for it? Drum roll please....... Granola Bars, Sweet Potato Muffins, Rosemary Olive Oil Bread (in the crock pot!), and Chili. We had the chili and bread for dinner tonight, and the granola bars and muffins are for the older boys lunch boxes for school. Oh and I was doing laundry the whole time! I'm so proud. Now I will crawl into bed and pass out! Well, once the kids are in bed that is.
Today I'll share the granola bar recipe since they are super easy and really yummy.
Basic Granola Bars
4 1/2 C Rolled Oats (regular not quick cooking, you could definitely use gluten free oats too!)
1 C Flour (choose your flour)
1 tsp Baking Soda
1 tsp Vanilla* (be aware that almost all vanilla extract is suspended in corn alcohol)
2/3 C Butter, Melted** (your choice of safe alternative like Earths Balance, depending on your allergens)
1/2 C Honey (I'm pretty syre you could use Agave Nectar as well)
1/3 C Brown Sugar Packed
1/2 C Add in of your choice, today I used raisins, but you can use nuts, dried fruit, peanut butter, mini chocolate chips from Enjoy Life brand, etc.
Directions:
Combine all ingredients except for the add in item. You may need to add a bit more honey to make it really hold together. I did. Then add in your extra item and mix til distributed evenly throughout mixture. Line a cake pan with foil and spray with cooking spray, I used Olive Oil spray. The easiest way to get the foil to shape correctly to your pan is to turn the pan over so the opening is on the counter lay the foil over it and shape it to fit the pan. Once you have it fitting snugly to the outside of the pan gently pull it off, maintaining the shape as much as you can, and flip your pan over and insert the foil. Dump your granola mixture into the cake pan and using a piece of wax paper to cover your hand (this will be sticky and the wax paper will keep your hands clean and your granola in the pan) press the granola mixture down firmly and evenly throughout the pan. Make sure you really compact and press the mixture really, really good. If not it will crumble apart after you bake them and try to cut them. When you think you have it pressed down enough, do it some more! Bake at 325* for 18-22 minutes, depending on how thick they are. You want them to be really golden brown. Allow to cool in the pan. Once cooled, flip your pan over and they will dump right out. Pull the foil away and cut into individual bars. I like to "wrap" mine in individual snack size baggies so they are easy to pack in the kids lunches.

Here they are after I popped them out of the pan and peeled the foil away.

All cut into individual bars and "wrapped" in baggies ready for lunches!
*Since most Vanilla Extract is suspended in Corn Alcohol there is a simple way to make your own. Buy a 750mL bottle of Potato Vodka and 2-3 Vanilla Beans. Put the beans into the vodka and place in a cool, dark place for about a month. Shake about once a week to mix up and get the bean to release more vanilla-ness.
**I have recently come to realize that the Earths Balance Soy Free Margarine that we've been using contain corn products (insert sad face here) and maybe one of the reasons the littlest one is still reacting. So someone, don't remember who, but someone I'm following on Pinterest pinned a Vegan "Butter" that looks super easy to make at home. I have yet to make it, but its dairy, soy, corn and gluten free! I'm super stoked to make it and once I make my next trip to the health foods store to get some of the ingredients I will let you all know how it comes out and pass on the recipe.
Tuesday, September 11, 2012
Top 6 (actually more like 10!) Allergen Elimination Diet
I haven't blogged in a while, been feeling quite a bit overwhelmed the last few days. I got an email from the kids GI doctor at the end of last week. We had done a pH probe study on my almost 3 year old and the results were the usual, leaving more questions than answers. But that's just how it goes with these kids. The littlest monster did really badly with the probe in, it's placed down into the esophagus via the nose. That in itself is very uncomfortable but he was gagging, retching, vomiting, refluxing and reswallowing through the entire 22 hours he had it in place. Most of that is to be expected with this test, but not to the extent that he was doing it. Well lo and behold I found a sippy cup wedged in between his crib mattress and the rail that had the residue of curdled old cow's milk in it the day after his probe was removed, while I was changing the sheets after he vomited all over his crib. The night before his probe was put in the hubby and I went out to dinner alone, yes you read that right we were ALONE! We left the kids with the sitter, who happens to be 16 and super sweet. She knows all about the kids food issues, but for some reason she gave the little one a cup of the hubbys fat free cow's milk when she put him to bed.
So I ended up having to email the doctor as soon as I made my discovery. The little one had been reacting to the cow's milk and that explained all his increased symptoms while the probe was in place. So this unexpected food challenge proved yet again that he still cannot tolerate cow's milk. Once the GI had the results from the probe study in hand he emailed me to let me know that they didn't show a level of acid reflux that would explain the littlest ones on going symptoms, not to mention what he experienced while the probe was in place. So we are to do a top 6 allergen elimination diet. This "diet", along with it's sister the top 8 allergen elimination diet, are considered the "silver" standard in diagnosis and treatment of non IgE mediated food allergies, such as eosinophilic disorders.
What we will do is removed all dairy, soy, wheat/gluten, eggs, nuts, and fish from the littlest ones diet. On top of those we will keep out of his diet his other "known" allergens, corn, citrus, and berries. The "gold" standard in diagnosis and treatment in these types of disorders is an elemental diet consisting of an amino acid based formula like Neocate, Elecare, or Nutramigen AA. Since the littlest one cannot tolerate these formulas at all, we've tried them all many times hoping that he would be able to use them and failing everytime, we have to use the elimination diet approach instead.
Once the littlest one has been on the diet consistently for about 6 weeks we will reintroduce one food at a time to him, about one food a week, and watch for any and all reactions. If he reacts once the food has been reintroduced then that food is considered a "failed" food and will be kept out of his diet. If there is no reaction to the food then that will be considered a "safe" food and will be added back in.
This diet is going to present all sorts of issues for me and my cooking and being able to provide a balanced and varied diet to him, but I am up to the challenge, I think. First off I will have to find him a new "milk". After we took him off cow's milk I tried a few different ones and the one that he seemed to like the best was almond milk. I've found it easy to cook with and he drinks it well. But with the new diet nuts are out. So back to the alternative milk aisle at the health food store I will go and grab a few to try out with him. I'm going to see if I can find a vanilla flavored hemp milk, it is one of the alternatives milks that's nutritional profile is the most similar to cow's milk, the fat and protein content. I tried it with him before, but bought the chocolate flavor which I was to find out he doesn't like chocolate milk at all, even his beloved almond milk.
There are a few different diets out there that I can pull from to come up with recipes and meals that he should be able to eat safely. Paleo is one that comes to mind. Basically the belief is that its best to go back to how humans ate before we became farmers, you eat what man would have been able to hunt or gather. I've found some really interesting looking recipes and will be trying those out. I guess it will be back to basics.
My biggest concern is finding a pizza crust recipe that he will like. Pizza is one of the only foods that I can count on that the littlest one will always eat. He loves pizza, always has. Weather it was with real cheese, or with Daiya cheese, he will eat it and eat it well! Since I will not strictly adhere to the Paleo lifestyle finding a gluten and wheat free pizza crust will be one of my top priorities. Once I've found one that is up to his standards, and mine, I will share it with you ASAP.
The hubby and I have a get away planned so once I am back from that this diet will get going in full on mode (I am still waiting on all the specific directions from the GI doctor), I can't ask my parents, who will be taking the kids for us while we are out of town, to take on this challenge when I haven't even set it up or even tackled the first of the obstacles myself yet.
So stay tuned for even more restrictive ingredient recipes that are good!
Tuesday, September 4, 2012
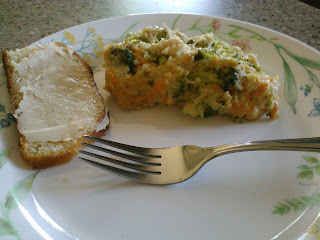
Dairy and Soy Free Chicken and Broccoli Quinoa Casserole
I stumbled across this recipe on Pinterest, I think, and thought it was an interesting take on an old stand by comfort food. It's also nice since it can be made completely gluten free and also vegan (at least the way I make it).
I've made this as a meal by adding in some shredded chicken and as a side dish by removing the chicken thereby making it vegan. Both ways it came out tasty, but personally I liked it best with the chicken added in.

Chicken and Broccoli Quinoa Casserole (Dairy, Soy, and Corn Free)
1 Batch of Cream of Mushroom Soup** (see below)
1/3 Cup Canola Mayonnaise or Soy Free Veganaise
2 Tbls Unsweetened Original Almond or Rice Milk
1 Cup Daiya Cheddar Cheese Shreds
Pinch of Sugar
1/4 tsp Black Pepper
1/2 tsp Garlic Salt
2 Cups Steamed Broccoli
1 1/2 Cups Cooked Quinoa
Shredded Chicken (I used the canned chicken from Costco)
First cook your quinoa:
3/4 Cup Quinoa
1 1/2 Cups Water or Chicken Broth
1/4 tsp Salt
In a fine mesh strainer, rinse the quinoa in cold water. In a small to medium sauce pan combine water or broth, quinoa, and salt. Bring to a boil over high heat. Reduce heat to low and cover. Cook for about 20 minutes or until the quinoa is light and fluffy and you can see the white curly tail.
Preheat your oven to 350*. Spray your casserole dish with nonstick cooking spray, use canola or olive oil. Set aside.
In a large bowl combine your soup, mayonnaise, milk, cheese, sugar, pepper and salt. Mix well. Stir in quinoa, broccoli and chicken.
Fill casserole dish with mixture. Bake for 30-35 minutes until edges are bubbly and golden.
Now you're probably asking yourself about the cream of mushroom soup called for in this recipe. Its super easy to make your own cream of mushroom soup at home and you can control the ingredients making it fit any dietary needs you have. Of course mine is made dairy, soy, and corn free, but I plan on making it gluten free as well soon.
Cream of Mushroom (or any other Cream of....) Soup
(Makes equivalent to one can of condensed soup)
Ingredients:
1 1/4 Cups Unsweetened, Unflavored Milk Alternative (Almond, Rice, Hemp, etc.)
3 Tbls Earths Balance Soy Free Margarine
1/4 Cup of Canned Mushrooms Chopped (or Chicken, Potato, Celery, etc.)
2-3 Tbls Chopped Onion (or to taste)
3 Tbls Flour or Starch (All Purpose Wheat, Tapioca, Potato, etc.)
1/4 tsp Salt
Dash of Pepper
Microwave milk for approx. 2.5-3 minutes.
Saute mushrooms and onions in a small sauce pan in margarine until soft and onions are translucent. Whisk in flour or starch, salt and pepper. Keep whisking mixture until it looks lightly browned. Keep whisking while pouring in milk slowly, until a thick creamy texture is achieved. Season to taste once its cooled a bit so you don't burn your tongue!
I make this up a few hours in advance of when I know I will need it and store it in the refrigerator and it has the exact same consistency of the canned stuff.
I've made this as a meal by adding in some shredded chicken and as a side dish by removing the chicken thereby making it vegan. Both ways it came out tasty, but personally I liked it best with the chicken added in.


Chicken and Broccoli Quinoa Casserole (Dairy, Soy, and Corn Free)
1 Batch of Cream of Mushroom Soup** (see below)
1/3 Cup Canola Mayonnaise or Soy Free Veganaise
2 Tbls Unsweetened Original Almond or Rice Milk
1 Cup Daiya Cheddar Cheese Shreds
Pinch of Sugar
1/4 tsp Black Pepper
1/2 tsp Garlic Salt
2 Cups Steamed Broccoli
1 1/2 Cups Cooked Quinoa
Shredded Chicken (I used the canned chicken from Costco)
First cook your quinoa:
3/4 Cup Quinoa
1 1/2 Cups Water or Chicken Broth
1/4 tsp Salt
In a fine mesh strainer, rinse the quinoa in cold water. In a small to medium sauce pan combine water or broth, quinoa, and salt. Bring to a boil over high heat. Reduce heat to low and cover. Cook for about 20 minutes or until the quinoa is light and fluffy and you can see the white curly tail.
Preheat your oven to 350*. Spray your casserole dish with nonstick cooking spray, use canola or olive oil. Set aside.
In a large bowl combine your soup, mayonnaise, milk, cheese, sugar, pepper and salt. Mix well. Stir in quinoa, broccoli and chicken.
Fill casserole dish with mixture. Bake for 30-35 minutes until edges are bubbly and golden.
Now you're probably asking yourself about the cream of mushroom soup called for in this recipe. Its super easy to make your own cream of mushroom soup at home and you can control the ingredients making it fit any dietary needs you have. Of course mine is made dairy, soy, and corn free, but I plan on making it gluten free as well soon.
Cream of Mushroom (or any other Cream of....) Soup
(Makes equivalent to one can of condensed soup)
Ingredients:
1 1/4 Cups Unsweetened, Unflavored Milk Alternative (Almond, Rice, Hemp, etc.)
3 Tbls Earths Balance Soy Free Margarine
1/4 Cup of Canned Mushrooms Chopped (or Chicken, Potato, Celery, etc.)
2-3 Tbls Chopped Onion (or to taste)
3 Tbls Flour or Starch (All Purpose Wheat, Tapioca, Potato, etc.)
1/4 tsp Salt
Dash of Pepper
Microwave milk for approx. 2.5-3 minutes.
Saute mushrooms and onions in a small sauce pan in margarine until soft and onions are translucent. Whisk in flour or starch, salt and pepper. Keep whisking mixture until it looks lightly browned. Keep whisking while pouring in milk slowly, until a thick creamy texture is achieved. Season to taste once its cooled a bit so you don't burn your tongue!
I make this up a few hours in advance of when I know I will need it and store it in the refrigerator and it has the exact same consistency of the canned stuff.
Sunday, September 2, 2012
Homemade Baby Wipes
I saw an interesting pin on Pinterest the other day and it caught my attention, Homemade Baby Wipes. Since I'm always looking for ways to save money in other areas so I can spend it on safe foods, I thought this would be a neat thing to give a try. Here is the link that has a great tutorial and all the info you will need to make your own baby wipes. http://theehingers.blogspot.com/2010/10/homemade-baby-wipes.html
So I drug all 3 boys out of the house today and made a trip to Target to get all the stuff I would need to make my very own wipes. First up I needed to make sure I could find an air tight container to keep them in, this was the biggest investment for these wipes, but should pay for itself over time. I was really looking for a round one like the one shown on the blog, but no such luck. But I did find a square one. It's an OXO SoftWorks 2.6qt. It has a neat push button top that seals it and makes it airtight.
Next I needed to find a good, extra gentle baby wash to use in the solution. My youngest gets really horrible diaper rashes whenever he is having a reaction to something and when that happens the wipes we normally use irritate his skin and make him cry, so we usually end up using paper towels soaked in warm water or a soft washcloth. Boy do I hate doing the laundry on those. There's a reason folks why I don't use cloth diapers, the laundry! My first thought for a gentle baby wash to use was the Burt's Bee's line. Well I happened to take a look at the ingredients, I do at everything now days, and low and behold, hydrolyzed soy protein is used in it! What?! Why?! So I put that one back up on the shelf as quick as can be. Next I went over to the California Baby line and took a look at their stuff. Much more expensive. They have a super sensitive line so I took a look at the ingredients and they have corn derived ingredients. Nope, that one went back on the shelf as well. I was starting to think I was not going to find one that would work for what I wanted. Then I looked at the very bottom shelf and there was a brand I hadn't seen before, BabyGanics. From what I could read, nothing that should cause a problem and the bottle was half what the California Baby brand was.
Next I went and picked up the roll of Bounty Select-A-Size paper towels and made sure they would fit into the container. Yep, they would work so off to check out we went. This takes fronting some money in the beginning, but should pay me back over time.
The hardest part was cutting the paper towel roll in half. That definitely took some elbow grease, but I really need to sharpen my knives. It took a little bit of time for the paper towels to soak up the solution, maybe about 15 mins. But the center cardboard tube came out easily after that and it was very easy to find the end of the roll in the center and pull it up.

Saturday, September 1, 2012
Dairy, Soy, and Corn Free Pizza and Cinnamon Sticks
Things have been extra crazy medically around here lately so I haven't had a chance to jump on here and post any new recipes in a few days. The littlest one just had a probe study done on Thursday and Friday and we had to travel 4+ hours round trip both days. My younger twin is still dealing with his kidney issues and we had an appointment with a urologist at our local children's hospital which I was not really impressed with. So after the holiday weekend this mommy's behind will kick into high gear and work on getting him into one of the top pediatric nephrology clinics in the country. Now the youngest little monster is having some serious GI distress, not sure if its from his probe study causing irritation or what, but I've been doing loads of laundry and scrubbing everything down that his "distress" has come into contact with just in case its not irritation and ends up being some bug or other that would love to make its rounds through our home. No thank you!
Ok, now that I've eluded to GI "distress" oh so nicely, aren't you hungry????? No, well too bad because if you skip these next few recipes you will be missing out big time!
When we discovered that we were going to have to have all 3 boys be on a restricted diet one of the first foods that came to mind that was out of the question for them was pizza. What little boy can have a "normal" life without pizza???!!! So I was determined to find a way to make pizza for my little guys at any cost! My first snafu came in regards to alternative cheeses. They are all so different from real cheese. They don't melt, look like plastic when they do melt, and taste pretty close to plastic period. I was venting to my friends on Facebook about how I was going to miss cheese and a couple of my friend who've been down this road before me mentioned a newer alternative cheese made from nutritional yeast called Daiya, http://www.daiyafoods.com/ . So I ran to the nutritional/health food store as fast as I could after taking a look at their website. I wasn't expecting much since all the other "cheeses" out there had left me with a bad taste in my mouth, literally. But boy was I surprised! This stuff is really good! It melts, stretches, looks like real cheese, a true alternative and great substitution!
Next I needed to find a good, easy to make pizza crust recipe since I have never made any type of bread in my life to this point! I searched and searched every store I could find for a premade or refrigerated pizza dough but all contained some form of dairy, soy or corn which took them completely out of the running in our house. I came across this recipe and it is super easy and tastes great and there are so many variations you can come up with. This basic dough is used in both my pizza recipe and in my cinnamon stick recipe. They are both so good!
Basic Pizza Dough
Ingredients:
1 packet active dry yeast
1 tsp Sugar
1 Cup Warm Water (110*)
2 1/2 Cups All Purpose or Bread Flour
2 Tbls Olive Oil
1 tsp Salt
Preheat your oven to 450*.
In a medium bowl dissolve the yeast and sugar in the warm water. Let sit covered in a warm spot for approx 10 minutes until it looks creamy and bubbly.
Stir in flour, salt, and oil and mix until smooth. Let rest for a minimum of 5 minutes. (I've made this up a few hours in advance and let it rest, covered, in a warm spot until I was ready to make my pizza and it comes out extra fluffy.)
Turn dough out onto a lightly floured surface. Pat and lightly knead for a few minutes, then roll into a ball and place on a greased pizza pan ( I use a foil lined cookie sheet since I don't have a pizza pan. Sometimes the pizzas don't come out completely round, usually a little lopsided, but they still taste great!) I like to sprinkle some granulated garlic down onto the greased sheet since we can't use corn meal. Pat and press into a round. Spread with pizza sauce, I use an 8oz can of Hunt's Tomato Sauce Roasted Garlic flavor, it is free of soy oil which most canned spaghetti sauce and pizza sauce are not. Top with your Daiya Mozzarella shreds and your favorite toppings. Bake for 10-15mins checking after 10 mins to make sure its not burning.
My kids love the pepperoni version as well as the veggie one with broccoli, mushrooms, black olives and tomatoes. I've even brought a couple slices to school for my boys when their class had a pizza party and their pizza looked better than the delivery and all the other kids wanted my sons pizza instead of their own!
To make your dough a little more flavorful I like to add in some granulated garlic and Italian herb mix into the dough while mixing.


Using this same basic pizza dough recipe you can make a tasty dessert to rival the big pizza delivery chains!
Cinnamon Sticks
Use the same basic pizza dough recipe listed above, I like to add into the dough:
1/4 Cup Sugar (about)
Sprinkle of Cinnamon and Nutmeg
Follow all the directions listed above. Knead out the dough and place on a greased foil lined cookie sheet. Pat out to the shape of the cookie sheet. Use a clean pizza cutter to score the dough so its easier to break apart after they are cooked. Brush dough with olive oil. Place in a 450* oven for about 15 minutes. When the dough is cooked through pull out of the oven and sprinkle with cinnamon and sugar.
While the sticks are baking in the oven you'll need to mix up a glaze to top them with once they are done. This is optional, but makes them taste amazing!
Glaze
1/2 Cup of Corn Free Powdered Sugar**
1 Tbls Melted Dairy and Soy Free Margarine (Earth Balance Soy Free)
1-2 Tbls Vanilla Almond or Rice Milk
Mix all ingredients together in a bowl until smooth. Drizzle the glaze over the sticks that have been sprinkled with cinnamon and sugar.

** I never knew that powdered sugar had corn in it until recently. It has corn starch to make the powdered sugar flow easily. When I found this out I was less than thrilled to learn another food had been taken off our list of "safe" foods. Actually I was pretty freaking bitter about it! But after some googling I found out that until pretty recently people used to make their own powdered sugar, they didn't buy it at the store. I was intrigued that I could make it myself. So here it is, the super complex recipe for:
Corn Free Powdered Sugar
1 Cup Sugar
1 Tbls Tapioca or Potato Starch
Place ingredients in your blender or food processor. Blend until powdery.
Yep, that's it!
Subscribe to:
Comments (Atom)