Yesterday I made some awesome banana bread for the kids, and I couldn't help myself from eating a little to much of it myself! It turned out really good! I've been avoiding making banana bread for a while now since we can no longer use eggs, thanks to the littlest monster who gets all rashy and miserable after eating them. But I've continued to save all my over ripe bananas in the freezer, I think I must have about 40 of them saved in there! I decided to try a little something that I've read about in the world of egg replacement, using mayo in place of eggs in a recipe. Yes you read that right, but I think this was thought up by people who just ran out of eggs and still wanted to bake something since mayo is made with eggs. But we have a mayo substitute that we've been using around here for a while and I thought, "What the hell! I'll give it a whirl!" We've been using Soy Free Veganaise with the kids in place of mayo for months and months now. I think it tastes like mayo, and even the hubby didn't know the difference when I ran out of regular mayo one time. I actually use this stuff alot in place of sour cream in recipes.
So according to these egg replacement websites I've been stalking, 3Tbls of mayo equals 1 egg. Ok easy enough. But we'll see. So I replaced the 2 eggs called for in the banana bread recipe I've been using for years and it is fantastic!!!!! Here you go, enjoy!
Banana Bread
1 1/4 C Sugar
1/2 C Earth Balance Coconut Spread
6 TBL Soy Free Veganaise
3 med very ripe Bananas, mashed
1/2 C Buttermilk replacement (2 tsp lemon juice + enough Mimicream to make the total 1/2C)
1 tsp Vanilla extract (I make my own using potato vodka and vanilla beans so its corn free)
2 1/2 C AP Unbleached Flour
2 tsp baking soda
1 tsp Salt
1 C Chopped Nuts (optional, I did not use nuts)
If you're going to be baking in a bread pan move your oven rack to the lowest position so the tops of the loaves are in the middle of the oven while baking. I used a silicone egg shaped tray to make mini loaves for Easter so I baked them like they were cupcakes and left the oven rake in the middle position.
Spray you pans with safe cooking spray, or make your own by mixing oil and water in a misting spray bottle, check Pinterest for complete directions.
Mix sugar, and coconut spread, and Veganaise in a large bowl, I used my Kitchen Aid mixer or you can use a large bowl and your hand mixer. This can be done by hand but if you have the tools, use them!!!! Stir in bananas, "buttermilk", and vanilla. Beat until smooth. Stir in flour, baking soda, and salt just until moist, if using nuts stir in. Divide batter between pans.
Bake two 8 in loaves for about 1 hour, one 9 in loaf for about 1 hour 15 minutes, or mini loaves for about 20-25 minutes. Cupcakes for about 15-20 minutes. Or until a toothpick inserted into center comes out clean. Remove from oven and allow to cool for about 5 minutes in pan, then remove from pan and allow to cool on a wire rack. Cool completely then cover and store, if it lasts that long!
This turned out so good! Enjoy!!!!!
*You can try this with a gluten free flour mix if you need gluten free, since we no longer do I'm back to using wheat in all my baking.
Showing posts with label dairy free. Show all posts
Showing posts with label dairy free. Show all posts
Saturday, March 30, 2013
Thursday, November 8, 2012
Chocolate Chip Cookies
We are in the midst of our second attempt to reintroduce eggs into the littlest ones diet. The first attempt was aborted because I goofed and added back in vanilla flavoring in his milk without thinking that a possible reaction could have been to that or to the eggs. So today I made chocolate chip cookies that are pretty much allergen free except for the egg. I adapted this recipe and have been messing with it for a while but I think today's tweaks came out the best so far and I'm pretty happy with them, happy enough to eat at least 6 cookies myself, so far..........

Chocolate Chip Cookies
Ingredients:
3/4 C granulated sugar
3/4 C packed brown sugar
1/2 C Palm shortening ( I used Spectrum brand)
1/2 C Coconut oil (needs to be in an almost solid state, so stick in the refrigerator if needed to get it to come together. You want it not too hard and not too soft, about the consistency of softened butter)
1 large egg
2 1/4 C Gluten free flour blend
1 tsp baking soda
1/2 tsp salt
1/2 C Agave Nectar (this amount is approximate, I just added until I got the level of moistness I wanted in the dough)
1/2 bag of Enjoy Life Chocolate Chips (or you can use raisins or other dried fruit or nuts)
Heat oven to 350*.
Beat sugars, egg, shortening, and coconut oil in a large bowl on medium until well combined. Stir in flour, baking soda, and salt, dough will be stiff. Add in agave nectar and chocolate chips, mix.
On foil lined baking sheets drop tablespoon full of dough and bake for about 7 minutes.
My first sheet I baked for 8 minutes and they came out a little over done, but the 7 minute time, in my oven, was perfect. A little crunchy on the edges and soft and chewy inside. I had made this recipe before with only palm shortening and no agave nectar and the dough was dry and crumbly and the cookies did not spread out when baked at all, they stayed hard little balls, with the addition of the coconut oil and the agave nectar they are sweet, soft, chewy, and oh so good!
Tuesday, September 4, 2012
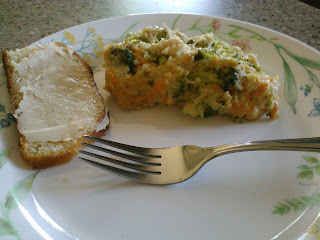
Dairy and Soy Free Chicken and Broccoli Quinoa Casserole
I stumbled across this recipe on Pinterest, I think, and thought it was an interesting take on an old stand by comfort food. It's also nice since it can be made completely gluten free and also vegan (at least the way I make it).
I've made this as a meal by adding in some shredded chicken and as a side dish by removing the chicken thereby making it vegan. Both ways it came out tasty, but personally I liked it best with the chicken added in.

Chicken and Broccoli Quinoa Casserole (Dairy, Soy, and Corn Free)
1 Batch of Cream of Mushroom Soup** (see below)
1/3 Cup Canola Mayonnaise or Soy Free Veganaise
2 Tbls Unsweetened Original Almond or Rice Milk
1 Cup Daiya Cheddar Cheese Shreds
Pinch of Sugar
1/4 tsp Black Pepper
1/2 tsp Garlic Salt
2 Cups Steamed Broccoli
1 1/2 Cups Cooked Quinoa
Shredded Chicken (I used the canned chicken from Costco)
First cook your quinoa:
3/4 Cup Quinoa
1 1/2 Cups Water or Chicken Broth
1/4 tsp Salt
In a fine mesh strainer, rinse the quinoa in cold water. In a small to medium sauce pan combine water or broth, quinoa, and salt. Bring to a boil over high heat. Reduce heat to low and cover. Cook for about 20 minutes or until the quinoa is light and fluffy and you can see the white curly tail.
Preheat your oven to 350*. Spray your casserole dish with nonstick cooking spray, use canola or olive oil. Set aside.
In a large bowl combine your soup, mayonnaise, milk, cheese, sugar, pepper and salt. Mix well. Stir in quinoa, broccoli and chicken.
Fill casserole dish with mixture. Bake for 30-35 minutes until edges are bubbly and golden.
Now you're probably asking yourself about the cream of mushroom soup called for in this recipe. Its super easy to make your own cream of mushroom soup at home and you can control the ingredients making it fit any dietary needs you have. Of course mine is made dairy, soy, and corn free, but I plan on making it gluten free as well soon.
Cream of Mushroom (or any other Cream of....) Soup
(Makes equivalent to one can of condensed soup)
Ingredients:
1 1/4 Cups Unsweetened, Unflavored Milk Alternative (Almond, Rice, Hemp, etc.)
3 Tbls Earths Balance Soy Free Margarine
1/4 Cup of Canned Mushrooms Chopped (or Chicken, Potato, Celery, etc.)
2-3 Tbls Chopped Onion (or to taste)
3 Tbls Flour or Starch (All Purpose Wheat, Tapioca, Potato, etc.)
1/4 tsp Salt
Dash of Pepper
Microwave milk for approx. 2.5-3 minutes.
Saute mushrooms and onions in a small sauce pan in margarine until soft and onions are translucent. Whisk in flour or starch, salt and pepper. Keep whisking mixture until it looks lightly browned. Keep whisking while pouring in milk slowly, until a thick creamy texture is achieved. Season to taste once its cooled a bit so you don't burn your tongue!
I make this up a few hours in advance of when I know I will need it and store it in the refrigerator and it has the exact same consistency of the canned stuff.
I've made this as a meal by adding in some shredded chicken and as a side dish by removing the chicken thereby making it vegan. Both ways it came out tasty, but personally I liked it best with the chicken added in.


Chicken and Broccoli Quinoa Casserole (Dairy, Soy, and Corn Free)
1 Batch of Cream of Mushroom Soup** (see below)
1/3 Cup Canola Mayonnaise or Soy Free Veganaise
2 Tbls Unsweetened Original Almond or Rice Milk
1 Cup Daiya Cheddar Cheese Shreds
Pinch of Sugar
1/4 tsp Black Pepper
1/2 tsp Garlic Salt
2 Cups Steamed Broccoli
1 1/2 Cups Cooked Quinoa
Shredded Chicken (I used the canned chicken from Costco)
First cook your quinoa:
3/4 Cup Quinoa
1 1/2 Cups Water or Chicken Broth
1/4 tsp Salt
In a fine mesh strainer, rinse the quinoa in cold water. In a small to medium sauce pan combine water or broth, quinoa, and salt. Bring to a boil over high heat. Reduce heat to low and cover. Cook for about 20 minutes or until the quinoa is light and fluffy and you can see the white curly tail.
Preheat your oven to 350*. Spray your casserole dish with nonstick cooking spray, use canola or olive oil. Set aside.
In a large bowl combine your soup, mayonnaise, milk, cheese, sugar, pepper and salt. Mix well. Stir in quinoa, broccoli and chicken.
Fill casserole dish with mixture. Bake for 30-35 minutes until edges are bubbly and golden.
Now you're probably asking yourself about the cream of mushroom soup called for in this recipe. Its super easy to make your own cream of mushroom soup at home and you can control the ingredients making it fit any dietary needs you have. Of course mine is made dairy, soy, and corn free, but I plan on making it gluten free as well soon.
Cream of Mushroom (or any other Cream of....) Soup
(Makes equivalent to one can of condensed soup)
Ingredients:
1 1/4 Cups Unsweetened, Unflavored Milk Alternative (Almond, Rice, Hemp, etc.)
3 Tbls Earths Balance Soy Free Margarine
1/4 Cup of Canned Mushrooms Chopped (or Chicken, Potato, Celery, etc.)
2-3 Tbls Chopped Onion (or to taste)
3 Tbls Flour or Starch (All Purpose Wheat, Tapioca, Potato, etc.)
1/4 tsp Salt
Dash of Pepper
Microwave milk for approx. 2.5-3 minutes.
Saute mushrooms and onions in a small sauce pan in margarine until soft and onions are translucent. Whisk in flour or starch, salt and pepper. Keep whisking mixture until it looks lightly browned. Keep whisking while pouring in milk slowly, until a thick creamy texture is achieved. Season to taste once its cooled a bit so you don't burn your tongue!
I make this up a few hours in advance of when I know I will need it and store it in the refrigerator and it has the exact same consistency of the canned stuff.
Subscribe to:
Posts (Atom)